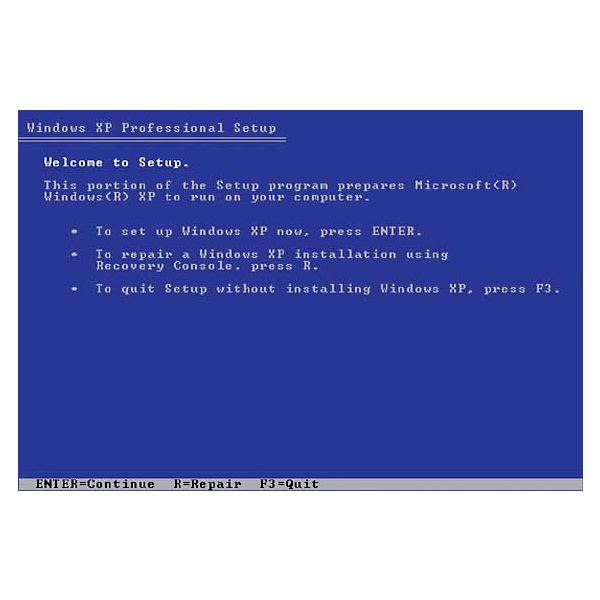
How to fix XP if the 2nd “R” Repair Option is unavailable
 Microsoft Windows(R) Recovery Console
The Recovery Console provides system repair and recovery functionality.
Type EXIT to quit the Recovery Console and restart the computer.
1: C:WINDOWS
Which Windows Installation would you like to log onto (To cancel, press ENTER)?
Go ahead and hit the number 1 on your keyboard, or whichever number corresponds to the operating system you were using when havoc struck. Enter your administrator password, and then hit enter. You’re in! Now it’s time to run with the big dogs! Do not be afraid, dear reader; I am here to help you.
If you type the following commands into your computer, it will work magic, akin to going back in time. There are three parts to this process, but believe me, they take much less time than reinstalling Windows XP and all your applications. So follow along with me, and keep in mind that each command must be typed exactly as you see it here. Please note that this procedure assumes that Windows XP is installed to the C:Windows folder. Make sure to change C:Windows to the appropriate windows folder if it’s at a different location. The copy commands will answer you with a little “file copied” message. The delete commands just move on to the next line. Because of the way your Web browser displays individual lines, a command might look to you like its two lines, so I’ve separated each command by an empty line. But anyway, type the whole command in one line, and when you’ve finished typing that command, hit the Enter key. Be sure to include the spaces I’ve included between each word here:
Section Addendum Note: In the following commands, we are simply copying some existing files to a temporary location. This way, if anything should go wrong down the line, you will at least still have access to the original files. These original files are not used again in this tutorial, but you should be aware that you made a backup copy of them in the following directory:
c:windowstmp
md c:windowstmp
cd c:windowssystem32config
copy system c:windowstmpsystem.bak
copy software c:windowstmpsoftware.bak
copy sam c:windowstmpsam.bak
copy security c:windowstmpsecurity.bak
copy default c:windowstmpdefault.bak
del system
del software
del sam
del security
del default
Important Addendum Note: When attempting the copy operations above, you may encounter an error message saying basically “unable to copy”. The way around this is to simply replace the copy (and delete) commands above with the following:
cd windowssystem32config
ren system system.kpp
ren software software.kpp
ren sam sam.kpp
ren security security.kpp
ren default default.kpp
I use the extension .kpp because windows XP sometimes likes to use the .bak extension itself and unlike the copy commands above, we are not putting our backup copies in the windows tmp directory, but rather we are leaving them in their original directory (but with the .kpp extension, so that windows will ignore them.). As I said before, these are just backup files, but it is good to know where they are if the repair fails and you ever need them. Note: The delete is no longer necessary because rename is basically like a “copy and delete” operation in one.
Section Addendum Note: In the following commands, we are simply copying some repair (basically default window install) files so that we can get windows XP to boot. (It will look awful and none of previous setup and programs will show up, but that is fine.) We simply need to make windows run able so that we can do the next parts (that will restore our full configuration as it was prior to the crash).
cd c:windowsrepair
copy system c:windowssystem32configsystem
copy software c:windowssystem32configsoftware
copy sam c:windowssystem32configsam
copy security c:windowssystem32configsecurity
copy default c:windowssystem32configdefault
Now you can relax for a minute. You’ve made it through the first part! Way to go! Now what did you just do? I’ll tell you. You first made a temporary directory called “tmp” (md tmp), and then into it, you copied all the files that boot up Windows. Then you deleted all those startup files, one of which is the stinker that got you into this mess in the first place. After that, you copied into that same place fresh startup files from a special repair directory. When you reboot, Windows will look for those files where it always does, and there won’t be a stinker in the bunch. The only thing is, there won’t be all your settings for all those applications you run every day, either. But not to worry, right now you’re sitting in something like a lifeboat — it’s not the original ship, but it’ll get you back to where you need to go. We’ll get everything back to that comfortable place, but only after we go through steps 2 and 3.
Now type Exit and watch your computer restart into Windows XP again. Be sure not to tell it to boot from the CD this time. But wait. That’s not the way you had XP set up before this disaster struck! That’s OK. We’re in a lifeboat right now — this isn’t your comfy cruise ship, not just yet. Hang in there. I’m going to show you how to restore your system to the way it was the moment before you told it to install that errant application, or whatever it was you did, so follow along and we’ll go to part 2.
Part 2
Here’s where you’ll copy the saved registry files from their backed up location by using System Restore. This folder is not available in Recovery Console and is normally not visible — Microsoft is protecting you from yourself by hiding it from you and locking it away from you. But we have the keys. Before you start this procedure, you’ll need to change several settings to make that folder visible:
1. Start Windows Explorer.
2. On the Tools menu, click Folder options.
3. Click the View tab.
4. Under Hidden files and folders, click to select Show hidden files and folders, and then click to clear the “Hide protected operating system files (Recommended)” check box.
5. Click Yes when the dialog box is displayed that confirms that you want to display these files.
6. Double-click the drive where you installed Windows XP to get a list of the folders. It’s important to click the correct drive.
7. Open the System Volume Information folder. This folder appears dimmed because it is set as a super-hidden folder. If you’re using the FAT32 file system, this will be easy. If you’re using NTFS, it won’t let you open the folder, but here’s how to get around that: Right-click on that system volume information folder and select Sharing and Security. Then click the Security tab. (No security tab? Skip two paragraphs.) Click Add, and then in the box that’s labelled “Enter the object names to select,” type the name of the user that’s at the top of the Start menu — that’s probably you. [Damn it, why do they say object names when it’s people’s names? I guess that’s Microsoft for you.]
Anyway, make sure you type the name the way it’s listed there on the Start Menu. I made the mistake of typing my first name only and it wouldn’t let me in. Type first and last name if that’s how it’s written on the top of the Start menu. After you’ve typed that in, click OK a couple of times and finally that monster will let you in.
But what if you don’t see a Security tab? Try this: Click to select the checkboxes (Addendum Note: check BOTH checkboxes) in the “Network sharing and security” area — one is labeled “Share this folder on the network” and the other is labelled “Allow network users to change my files.” Change the share name to something short, like sysinfo. Then it’ll let you in. After you’re done with this entire rescue operation, you might want to go back and change these back to the way they were before, for maximum security. (Addendum Note: If you get an error when you change the name to sysinfo, and hit apply/ok, just try it again…that happened to me, but it worked on the second try with no problems.)
OK. Now here you are, in the inner sanctum where only the high priests go. Be not afraid, all ye who enter here. As Microsoft so eloquently puts it:
NOTE: This folder contains one or more _restore {GUID} folders such as “_restore{87BD3667-3246-476B-923F-F86E30B3E7F8}”.
8. Open a folder that was not created at the current time. You may have to click Details on the View menu to see when these folders were created. There may be one or more folders starting with “RP x under this folder. These are restore points.
Addendum Note: The System Volume is NOT a subdirectory the windows directory. So if you cannot find it, go up one directory level and look again.
9. Open one of these folders to locate a Snapshot subfolder; the following path is an example of a folder path to the Snapshot folder:
C:System Volume Information_restore{D86480E3-73EF-47BC-A0EB-A81BE6EE3ED8}RP1Snapshot
From the Snapshot folder, copy the following files to the C:WindowsTmp folder (you can use your mouse, you’re in Windows now, remember?):
_registry_user_.default (Addendum Note: Notice the period (“.”) before the word default)
_registry_machine_security
_registry_machine_software
_registry_machine_system
_registry_machine_sam
This is how Microsoft explains this: “These files are the backed up registry files from System Restore. Because you used the registry file created by Setup, this registry does not know that these restore points exist and are available. A new folder is created with a new GUID under System Volume Information and a restore point is created that includes a copy of the registry files that were copied during part one. This is why it is important not to use the most current folder, especially if the time stamp on the folder is the same as the current time.”
Anyway, you’re still not done. Don’t worry, the magic is about to begin. Believe me, if you do this in front of your friends, they’ll start thinking you’re some kind of god. So, heavenly father, get ready to dazzle ’em.
Now it’s time to place those files you just made visible to the Recovery Console where they belong. And to do that, we need to get back into the Recovery Console. So, make sure your CD is in the drive, and restart Windows, this time hitting any key when it tells you to do that if you want to boot from CD. Yes, you want to boot from CD, so you can launch your old cryptic pal, the Recovery Console. Type R after it goes through that file-reading routine that looks like an install but isn’t. Then you’re back into our dark-suited friend with its ominous command line. It’s kinda like going into the basement to fix some broken pipe or something. But we’re not scared. The command line is our flashlight and friend. Here we go:
Part 3
In part three, you delete the existing registry files, and then copy the System Restore Registry files to the C:WindowsSystem32Config folder:
From within Recovery Console, type the following commands:
Section Addendum Note: Here we are simply replacing those “default” repair files with valid and current restore point files. So we delete the old files (default) files and copy in the new files. If get errors when trying to delete, you can simply skip the delete commands and just do the copy (and when prompted to overwrite, type Y (for yes) and hit enter
cd c:windowssystem32config
del sam del security
del software
del default
del system
cd c:windowstmp
copy _registry_machine_software c:windowssystem32configsoftware
copy _registry_machine_system c:windowssystem32configsystem
copy _registry_machine_sam c:windowssystem32configsam
copy _registry_machine_security c:windowssystem32configsecurity
copy _registry_user_.default c:windowssystem32configdefault
(Notice the period (“.”) before the word default in the first parameter)
Now you’re done! Type exit and your computer will reboot into whichever restore file you chose. But wait. If it’s not the right one, that’s OK, you can now go into your System Restore area and pick a different restore point if you want. There’s a whole calendar full of them in there. I bet you didn’t know that Windows XP is watching just about every move you make, taking notes all the while. It can restore about any state you had on that machine. And the best part is, even when it’s doing all that, it’s still 10% faster than Windows 2000 according to our extensive tests here at the Midwest Test Facility. Here’s how to get into that restore area if you’re not happy with the current restore point:
1. Click Start, then click All Programs.
2. Click Accessories, and then click System Tools.
3. Click System Restore, and then click Restore to a previous Restore Point.